Running Friendli Container on SageMaker
Introduction
This guide will walk you through creating a real-time inference endpoint in Amazon SageMaker with Friendli Container backend. By utilizing Friendli Containers in your SageMaker pipeline, you'll benefit from the Friendli Engine's speed and resource efficiency. We'll explore how to create inference endpoints using both the AWS Console and the boto3 Python SDK.
General Workflow
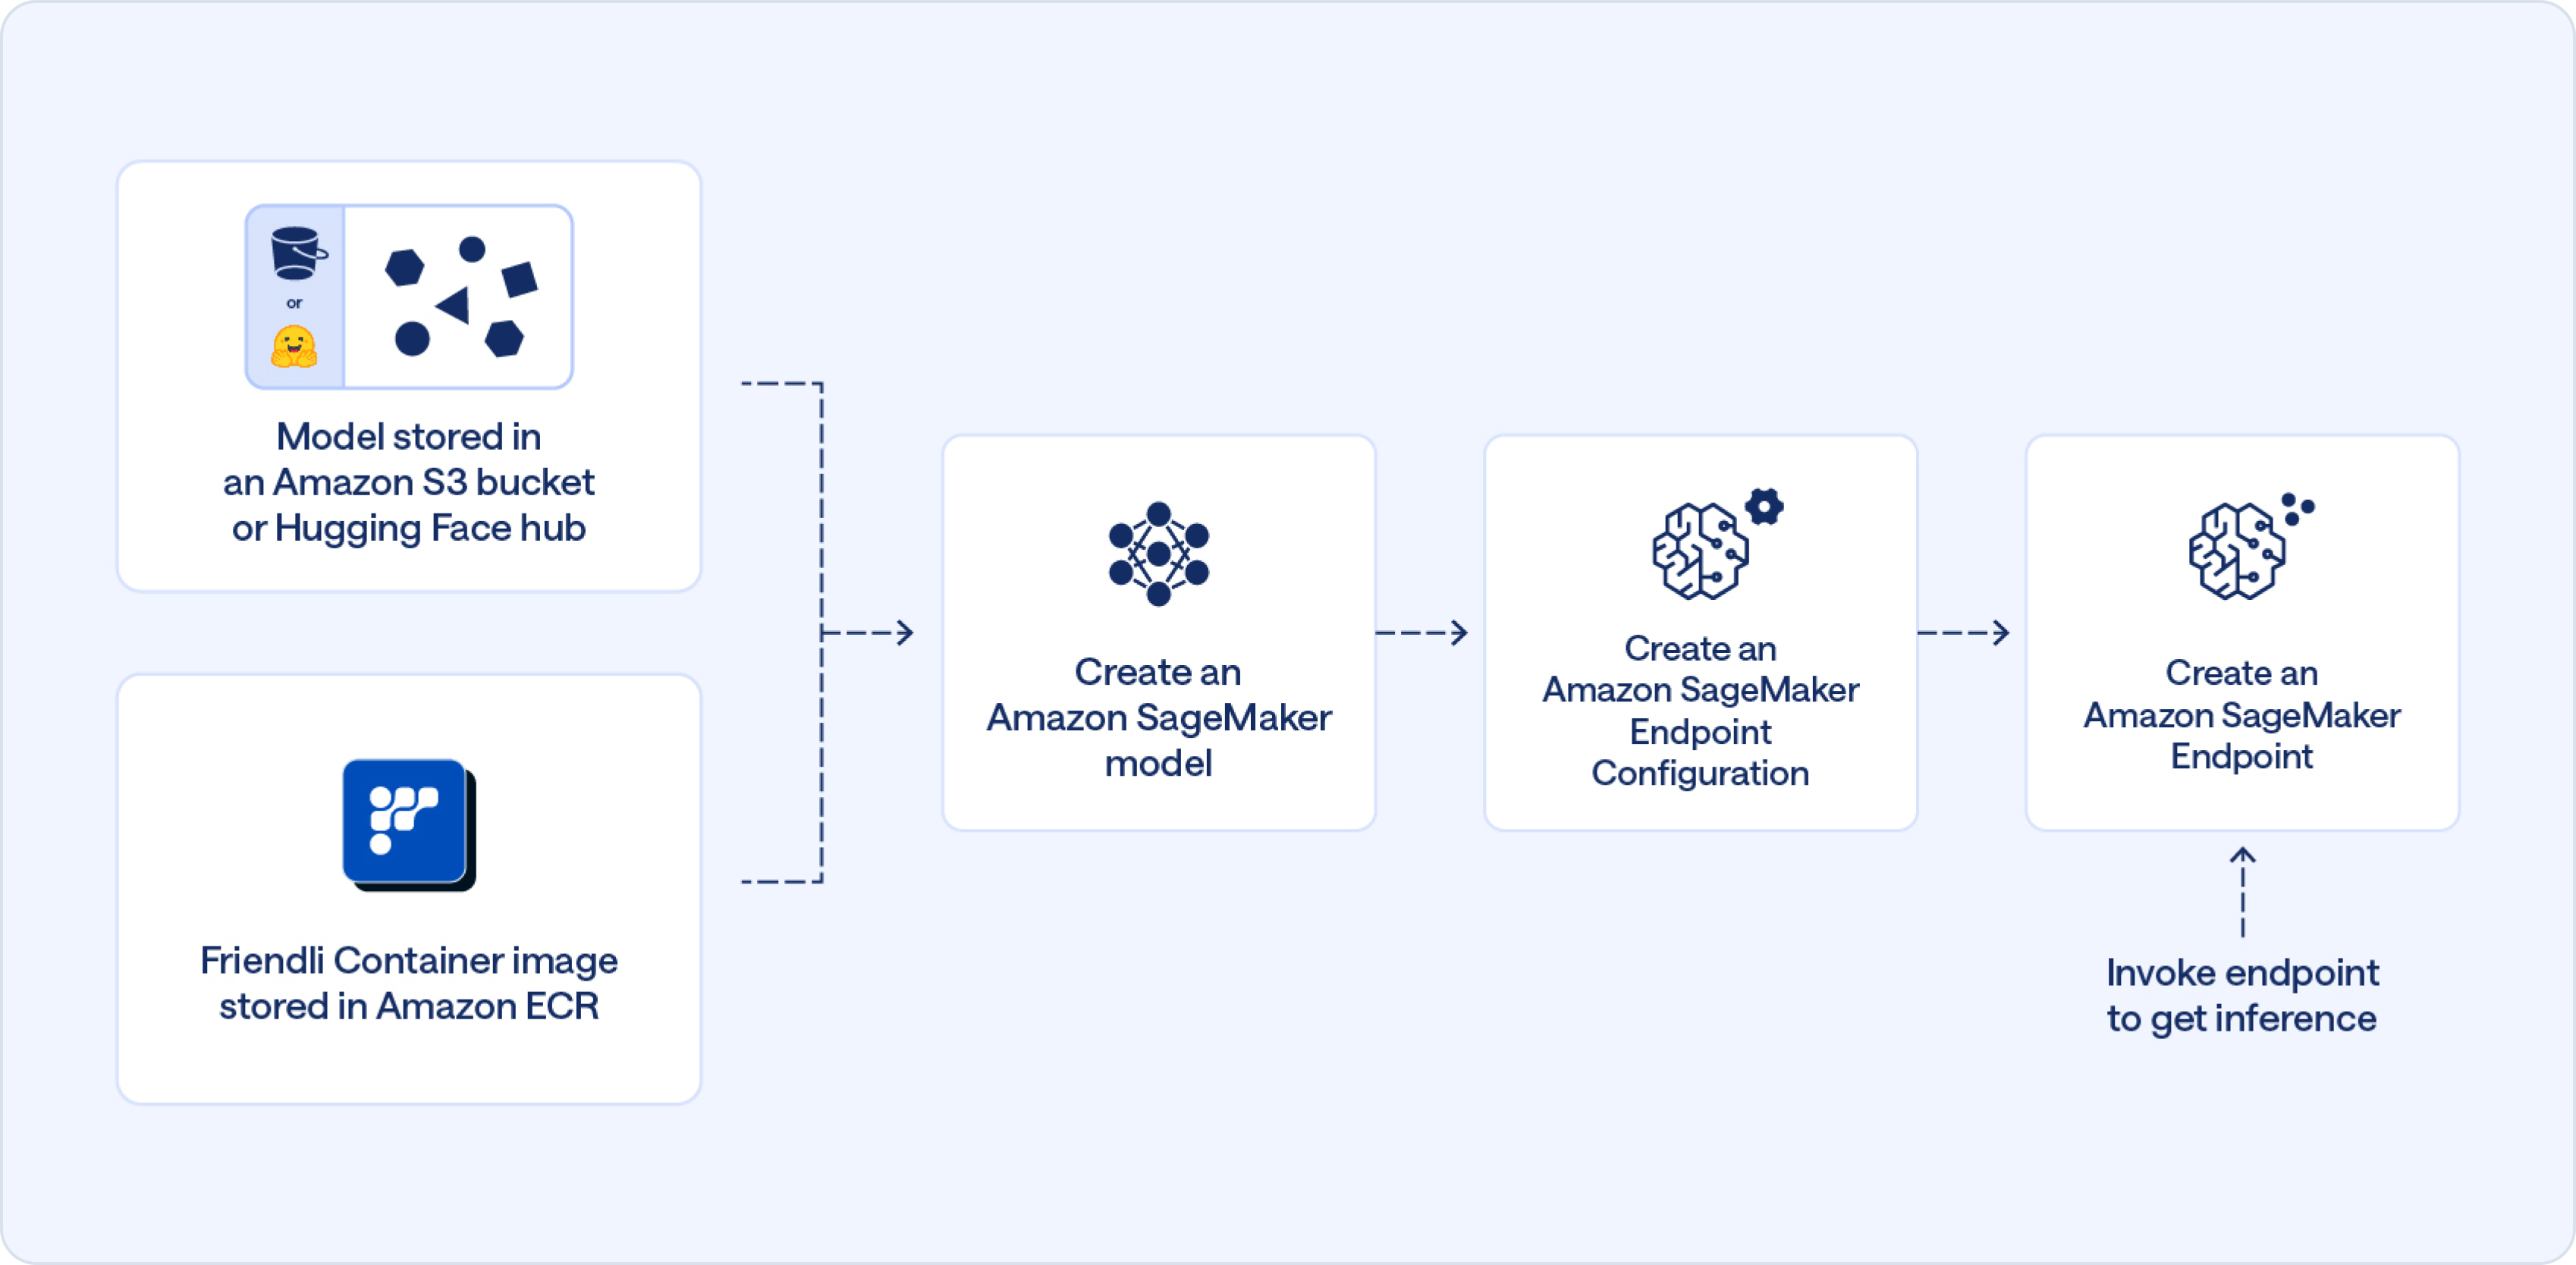
- Create a Model: Within SageMaker Inference, define a new model by specifying the model artifacts in your S3 bucket and the Friendli container image from ECR.
- Configure the Endpoint: Create a SageMaker Inference endpoint configuration by selecting the instance type and the number of instances required.
- Create the Endpoint: Utilize the configured settings to launch a SageMaker Inference endpoint.
- Invoke the Endpoint: Once deployed, send requests to your endpoint to receive inference responses.
Prerequisite
Before beginning, you need to push the Friendli Container image to an ECR repository on AWS. First, prepare the Friendli Container image by following the instructions in Pulling Friendli Container Image. Then, tag and push the image to the Amazon ECR repository as guided in Pushing a Docker image to an Amazon ECR private repository.
Using the AWS Console
Let's delve into the step-by-step instructions for creating an inference endpoint using the AWS Console.
Step 1: Creating a Model
You can start creating a model by clicking on the Create model button under SageMaker > Inference > Models. Then, configure the model with the following fields:
- Model settings:
- Model name: A model name.
- IAM role: An IAM role that includes the
AmazonSageMakerFullAccesspolicy.
- Container definition 1:
- Container input option: Select the "Provide model artifacts and inference image location".
- Model Compression Type:
- To use a model in the S3 bucket:
- When the model is compressed, select "CompressedModel".
- Otherwise, select "UncompressedModel".
- When using a model from the Hugging Face hub, any option would work fine.
- To use a model in the S3 bucket:
- Location of inference code image: Specify the ARN of the ECR repo for the Friendli Container.
- Location of model artifacts (optional):
- To use a model in the S3 bucket: Specify the S3 URI where your model is stored. Ensure the file structure matches the directory format compatible with the
--hf-model-nameoption of the Friendli Container. - When using a model from the Hugging Face hub, you can leave this field empty.
- To use a model in the S3 bucket: Specify the S3 URI where your model is stored. Ensure the file structure matches the directory format compatible with the
- Environment variables:
- Always required:
FRIENDLI_CONTAINER_SECRET: Your Friendli Container Secret. Refer to Preparing Container Secret to learn how to get the container secret.SAGEMAKER_MODE: This should be set toTrue.SAGEMAKER_NUM_DEVICES: Number of devices to use for tensor parallelism degree.
- Required when using a model in the S3 bucket:
SAGEMAKER_USE_S3: This should be set toTrue.
- Required when using a model from the Hugging Face hub:
SAGEMAKER_HF_MODEL_NAME: The Hugging Face model name (e.g.,mistralai/Mistral-7B-Instruct-v0.2)- For private or gated model repos:
HF_TOKEN: The Hugging Face secret access token.
- Always required:
Step 2: Creating an Endpoint Configuration
You can start by clicking on the Create endpoint configuration button under SageMaker > Inference > Endpoint configurations.
- Endpoint configuration:
- Endpoint configuration name: The name of this endpoint configuration.
- Type of endpoint: For real-time inference, select "Provisioned".
- Variants:
- To create a "Production" variant, click "Create production variant".
- Select the model that you have created in Step 1.
- Configure the instance type and count by clicking on "Edit" in the Actions column.
- Create the endpoint configuration by clicking "Create endpoint configuration".
Step 3: Creating SageMaker Inference Endpoint
You can start by clicking the Create endpoint button under SageMaker > Inference > Endpoints.
- Select "Use an existing endpoint configuration".
- Select the endpoint configuration created in Step 2.
- Finish by clicking on the "Create endpoint" button.
Step 4: Invoking Endpoint
When the endpoint status becomes "In Service", you can invoke the endpoint with the following script, after filling in the endpoint name and the region name:
import boto3
import json

endpoint_name = "FILL OUT ENDPOINT NAME"
region_name = "FILL OUT AWS REGION"

sagemaker_runtime = boto3.client("sagemaker-runtime", region_name=region_name)

prompt = "Story title: 3 llamas go for a walk\nSummary: The 3 llamas crossed a bridge and something unexpected happened\n\nOnce upon a time"
payload = {
    "prompt": prompt,
    "max_tokens": 512,
    "temperature": 0.8,
}

response = sagemaker_runtime.invoke_endpoint(
    EndpointName=endpoint_name,
    Body=json.dumps(payload),
    ContentType="application/json",
)

print(response['Body'].read().decode('utf-8'))
Using the boto3 SDK
Next, let’s discover the process for creating a SageMaker endpoint using the boto3 Python SDK. You can achieve this by using the code snippet below. Be sure to fill in the custom fields, customized for your specific use case:
import boto3
from sagemaker import get_execution_role

sm_client = boto3.client(service_name='sagemaker')
runtime_sm_client = boto3.client(service_name='sagemaker-runtime')

account_id = boto3.client('sts').get_caller_identity()['Account']
region = boto3.Session().region_name
role = get_execution_role()

endpoint_name="FILL OUT ENDPOINT NAME"
model_name="FILL OUT MODEL NAME"
container = "FILL OUT ECR IMAGE NAME"  # <ACCOUNT>.dkr.ecr.<REGION>.amazonaws.com/IMAGE

instance_type = "ml.g5.12xlarge" # instance type

container = {
    'Image': container,
    'Environment': {
        "HF_TOKEN": "<HUGGINGFACE ACCESS TOKEN>",
        "FRIENDLI_CONTAINER_SECRET": "<FRIENDLI CONTAINER SECRET>",
        "SAGEMAKER_HF_MODEL_NAME": "<HUGGINGFACE MODEL NAME>",  # e.g) meta-llama/Meta-Llama-3-8B
        "SAGEMAKER_MODE": "True",  # Should be true
        "SAGEMAKER_NUM_DEVICES": "4",  # Number of GPUs in `instance_type`
    }
}

endpoint_config_name = 'FILL OUT ENDPOINT CONFIG NAME'

# Create a model
create_model_response = sm_client.create_model(
    ModelName=model_name,
    ExecutionRoleArn=role,
    Containers=[container],
)

# Create an endpoint configuration
create_endpoint_config_response = sm_client.create_endpoint_config(
    EndpointConfigName=endpoint_config_name,
    ProductionVariants=[
        {
            'InstanceType': instance_type,
            'InitialInstanceCount': 1,
            'InitialVariantWeight': 1,
            'ModelName': model_name,
            'VariantName': 'AllTraffic',
        },
    ],
)

endpoint_name = "FILL OUT ENDPOINT NAME"

# Create an endpoint
sm_client.create_endpoint(
    EndpointName=endpoint_name,
    EndpointConfigName=endpoint_config_name,
)

sm_client.describe_endpoint(EndpointName=endpoint_name)
You can invoke this endpoint by following Step 4.
By following these guides, you'll be able to seamlessly deploy your models using Friendli Containers on SageMaker endpoints and leverage their capabilities for real-time inference.